Providing Liquidity on Elektrik

This guide is crafted to help you understand and navigate the process of providing liquidity on Elektrik, the recently launched decentralised exchange (DEX) on LightLink network.
Welcome to the world of decentralized finance (DeFi)! This guide is crafted to help you understand and navigate the process of providing liquidity on Elektrik, the recently launched decentralised exchange (DEX) on LightLink network. Don't worry if some terms sound alien; we'll explain everything as simply as possible.
Understanding Liquidity Pools
Before you start, it's crucial to understand what a 'liquidity pool' is. Imagine a big pot where users around the world deposit their cryptocurrencies. This 'pot' allows others to trade their tokens, ensuring trades are quick and prices stable. By adding your tokens to this pool, you're acting as a 'liquidity provider', and in return, you earn fees from the trades happening in the pool.
What You Need to Get Started
- Cryptocurrency Wallet: You'll need a digital wallet that supports EVM compatible chains, as Elektrik operates on LightLink. Examples include MetaMask, Coinbase Wallet, or Trust Wallet.
- Cryptocurrency: Ensure you have some ETH (Ethereum) or other supported tokens to contribute to the pool. You'll also need some extra ETH for transaction fees, known as 'gas fees'.
- Connection to Elektrik: Connect your wallet to the Elektrik interface.
Let's get started
Visit the Elektrik site and click on Pools at the top of the screen, you will be presented with a screen that has a panel without any established positions.
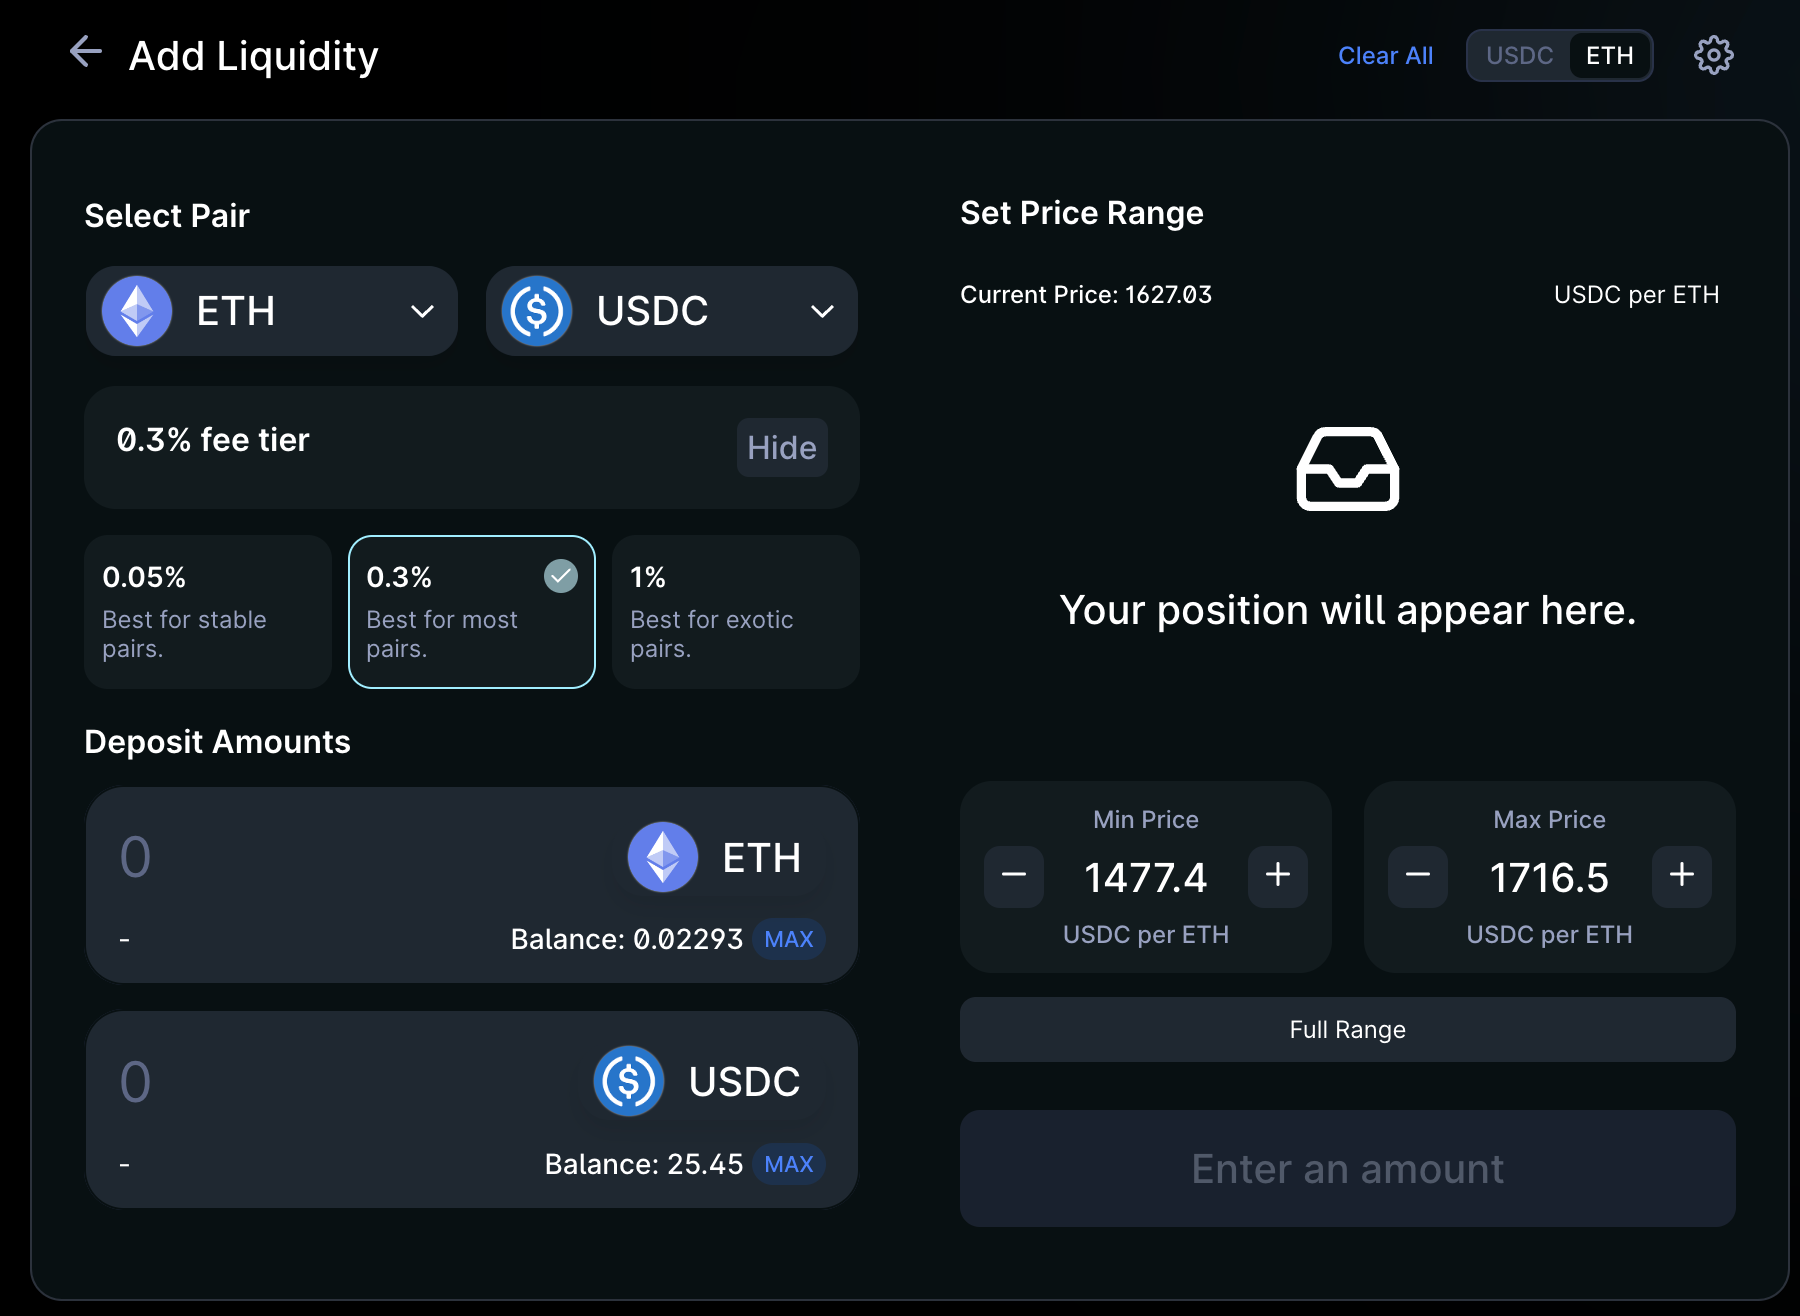
Click "New Position", and you'll be presented with the following screen:
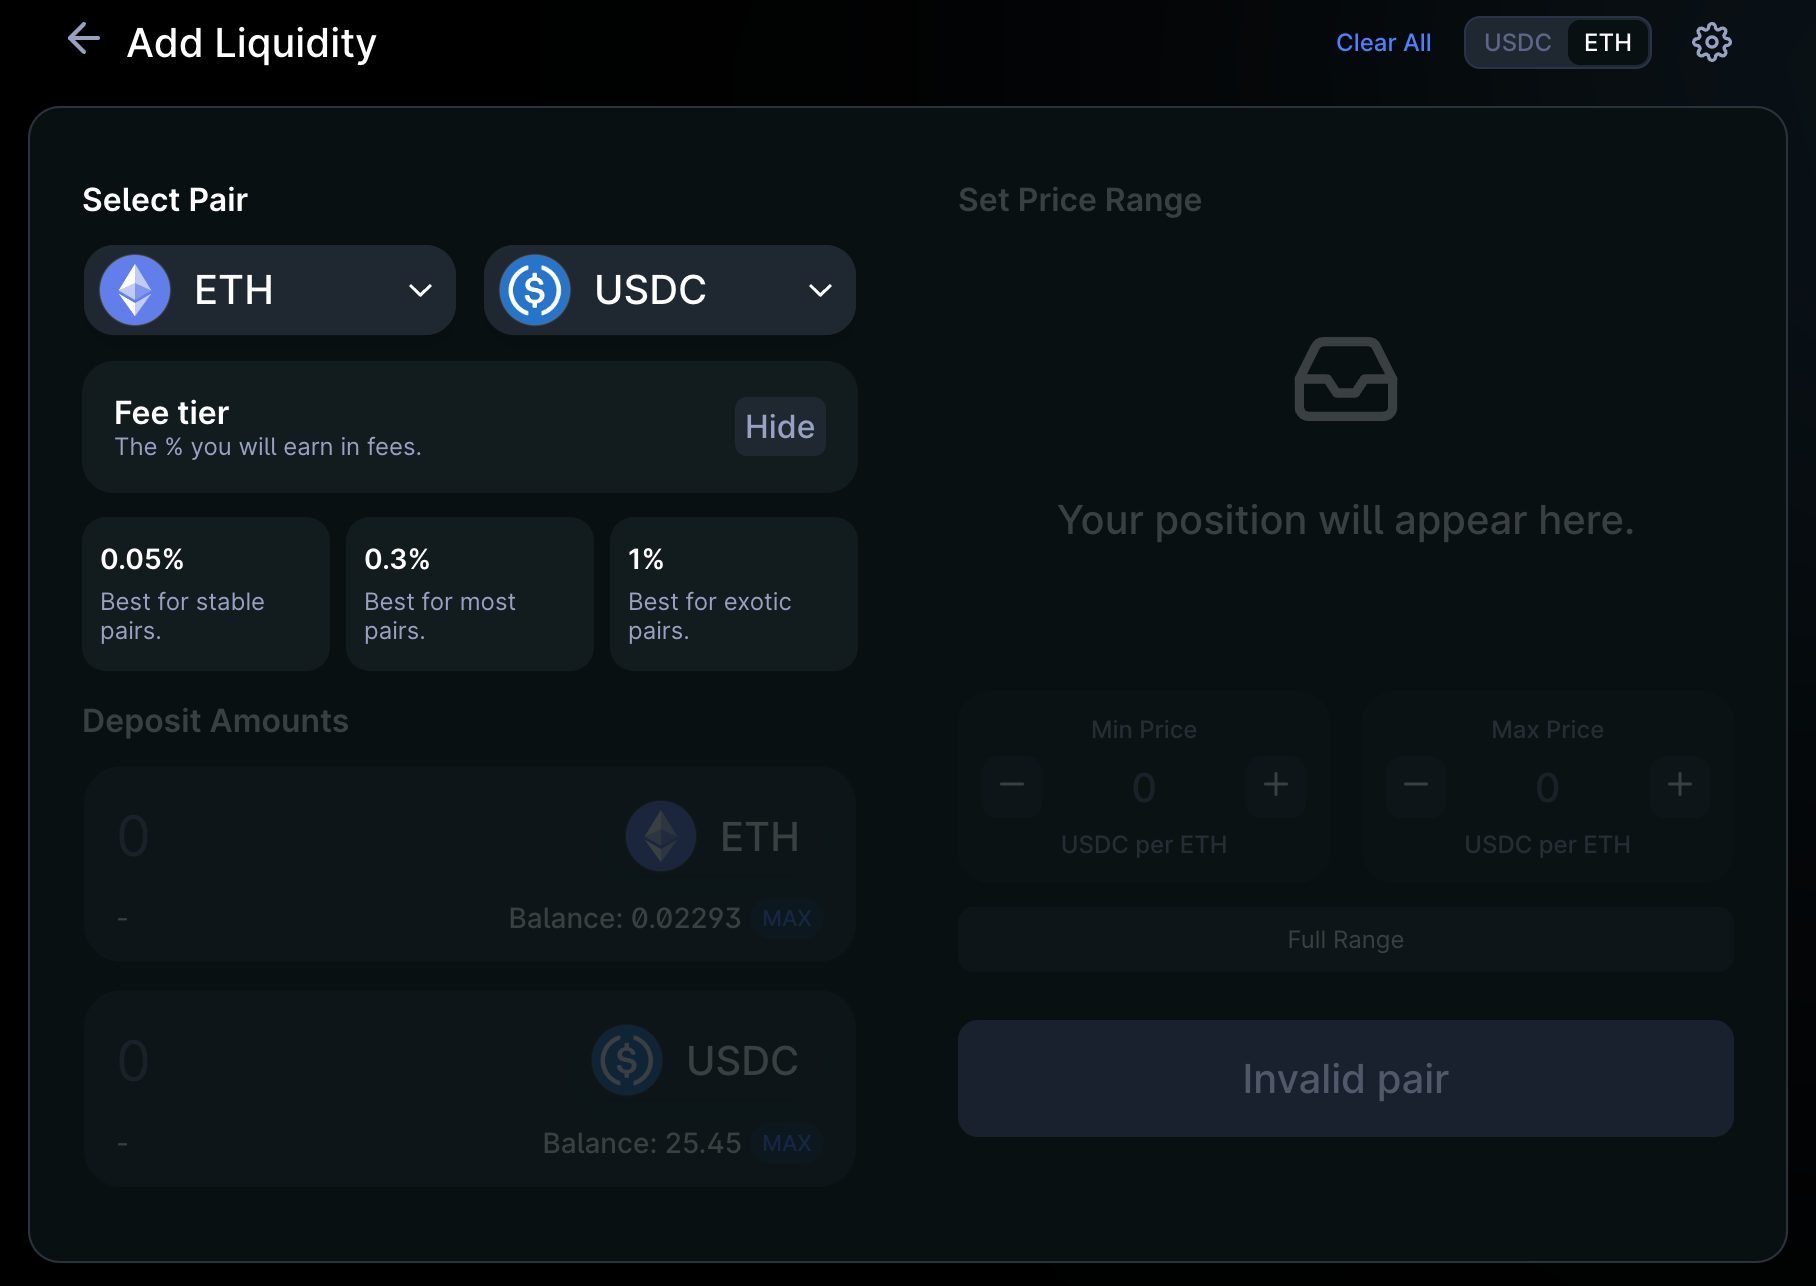
Select the tokens you would like to pair within the pool. You will then need to select your fee tier.
In Elektrik, when you decide to provide liquidity, you're required to choose a fee tier. This fee is a small percentage of each trade that happens in your liquidity pool, and it's a reward you earn for providing liquidity.
Here are the available fee tiers:
- 0.01%: This tier is for pools with extremely high trading volumes. It's the lowest fee, used for pairs that expect many trades, often with lower profit per trade.
- 0.05%: This is a moderate level, suitable for trades that are still frequent but not as high-volume as those in the 0.01% tier.
- 0.3%: This is the standard fee tier, used for the majority of token pairs. It offers a balance between trade frequency and return per trade.
- 1%: This tier is for pools with lower trading volumes, typically involving tokens that are less commonly traded. The higher fee compensates for the lower number of trades.
After selecting your tokens and fee tier, one of two scenarios will occur:
- Joining an Existing Pool: If a liquidity pool with your chosen token pair and fee tier already exists, your tokens will be added to this pool. You're essentially contributing to an existing pool, and in return, you'll receive a portion of the fees from trades in this pool.
- Creating a New Pool: If no pool exists for your token pair and fee tier, your action of adding liquidity will create a new pool. You will be the first liquidity provider in this pool, and you'll start earning fees from trades involving your token pair at the selected fee tier.
By selecting a fee tier and adding your tokens, you're either bolstering an existing pool or starting a new one, both of which are crucial actions in the liquidity provision process.
Setting the Price Range
In Elektrik, one of the unique features you'll encounter is the ability to set a specific price range for your liquidity. This is a bit different from previous versions and other platforms where you'd just provide assets without this level of control. Here's what it means and how it works.
Choosing Your Price Range
When you decide to add your tokens to a liquidity pool, Elektrik allows you to set a price range for your position. Essentially, you're specifying the prices at which you're willing to provide your tokens for trades.
You have two options: set a specific price range (e.g., between $100 and $150) or choose to provide liquidity across the full price range, meaning your tokens will be available for trading regardless of the price.
What Happens If the Price Moves Out of Your Range
Here's the catch: if the market price of your tokens goes outside the limits you've set, your liquidity is effectively removed from the pool temporarily. Why? Because you've specified you only want to trade within that range.
When this happens, your position is "concentrated" into one of the two assets, depending on which way the price moved. It means you won't be earning fees from trades because your tokens aren't being traded. You're more like holding the asset rather than providing liquidity for it.
About Price Rounding and Ticks
In Elektrik, prices are organized in "ticks," which are specific price points on the trading pair curve. When you set your price range, the system will round your prices to the nearest tick. This is a normal part of how the protocol organizes prices and doesn't negatively impact your position.
Enter your token amounts
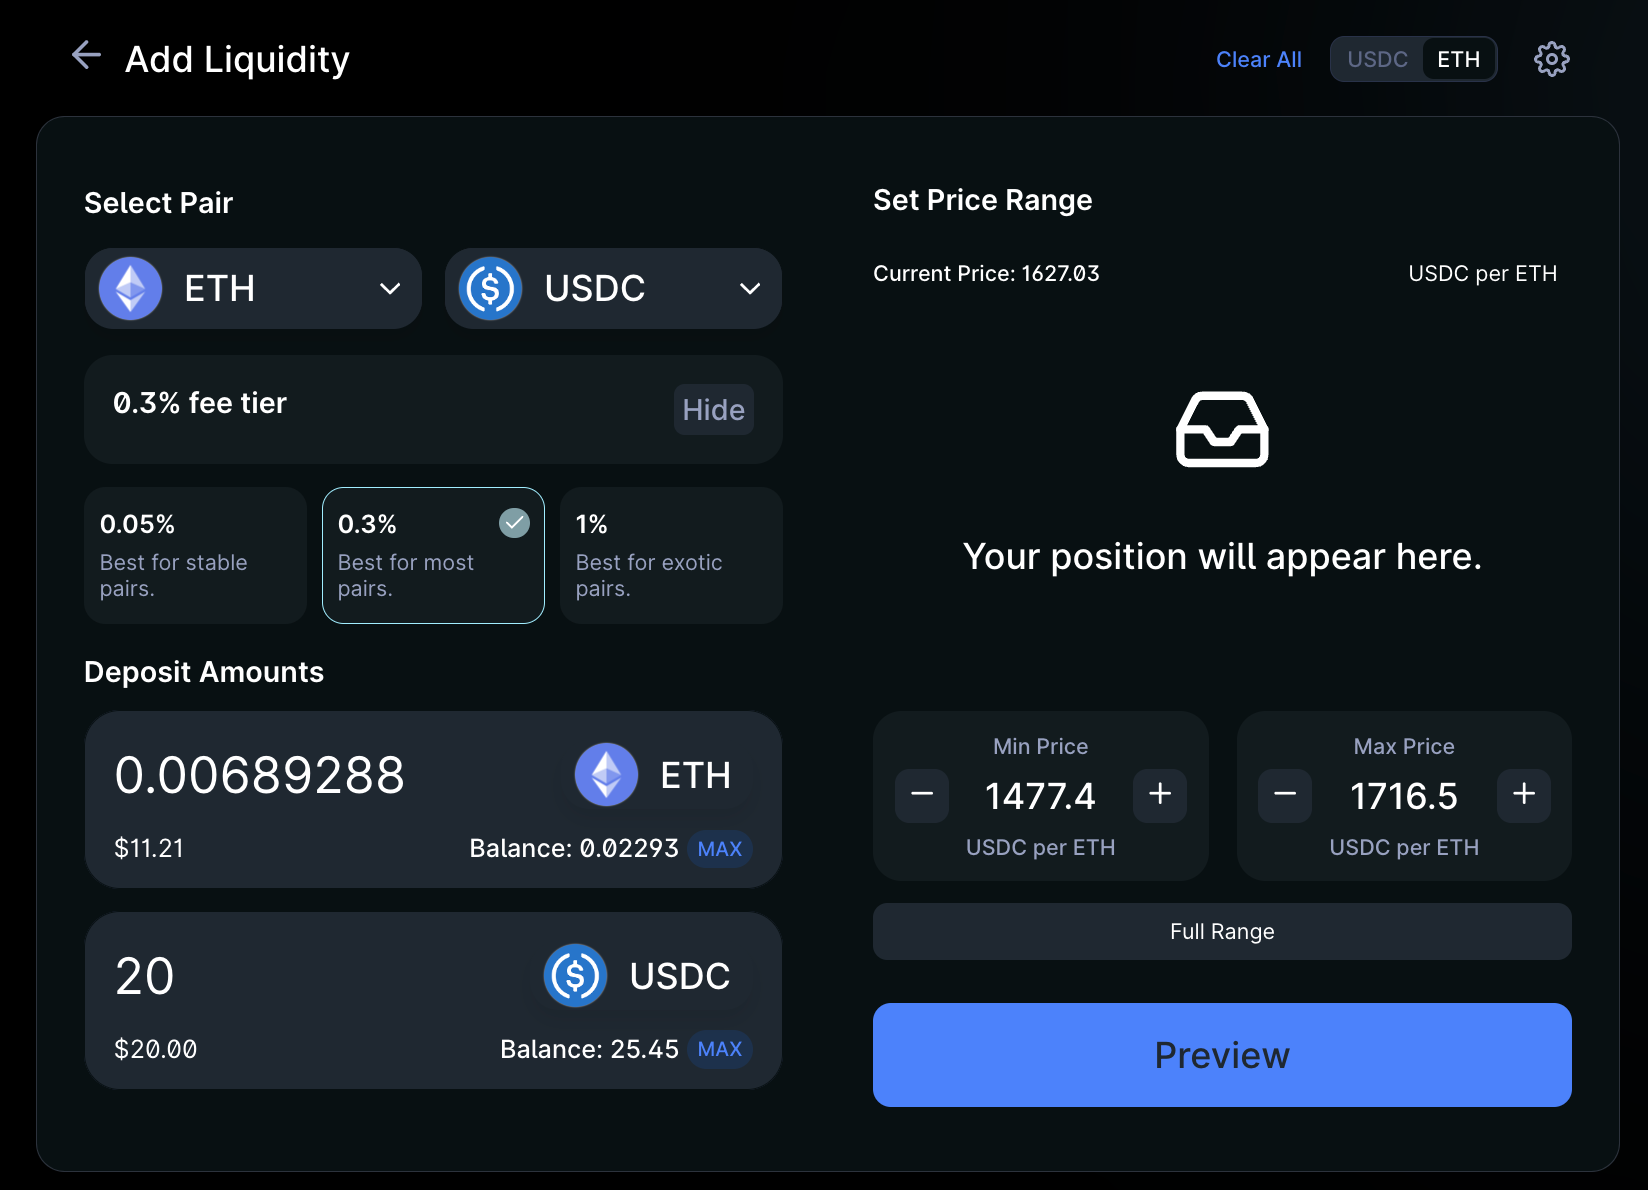
When you're setting up your position in a Elektrik liquidity pool, you'll need to deposit the tokens you want to provide as liquidity. Here's how this works:
Entering the Deposit Amounts
You'll see two input boxes corresponding to the two tokens in your chosen pair. You need to enter the amount of the first token you're willing to deposit.
Once you input this number, Elektrik automatically calculates and fills in the required amount for the second token. This ensures that the ratio between the tokens matches the current market conditions for the price range you've set.
Understanding the Ratio Adjustment
The platform adjusts the amounts based on the specific price range you've chosen, ensuring your deposit is balanced. This is crucial because the liquidity you provide needs to match the going rates between those tokens within your specified range.
Single Asset Deposit in Certain Price Ranges
Now, there's an interesting scenario: if you've chosen a price range that doesn't include the current market price (meaning you anticipate the price will move into your range soon), you're essentially betting on a future condition.
In this case, Elektrik doesn't require you to deposit both tokens. You only need to provide the single asset that you believe will be relevant for trading within your chosen price range. This is because, outside of your price range, the platform isn't using your liquidity for trades, so it doesn't need the second token.
Adding your liquidity
Preview Your Position
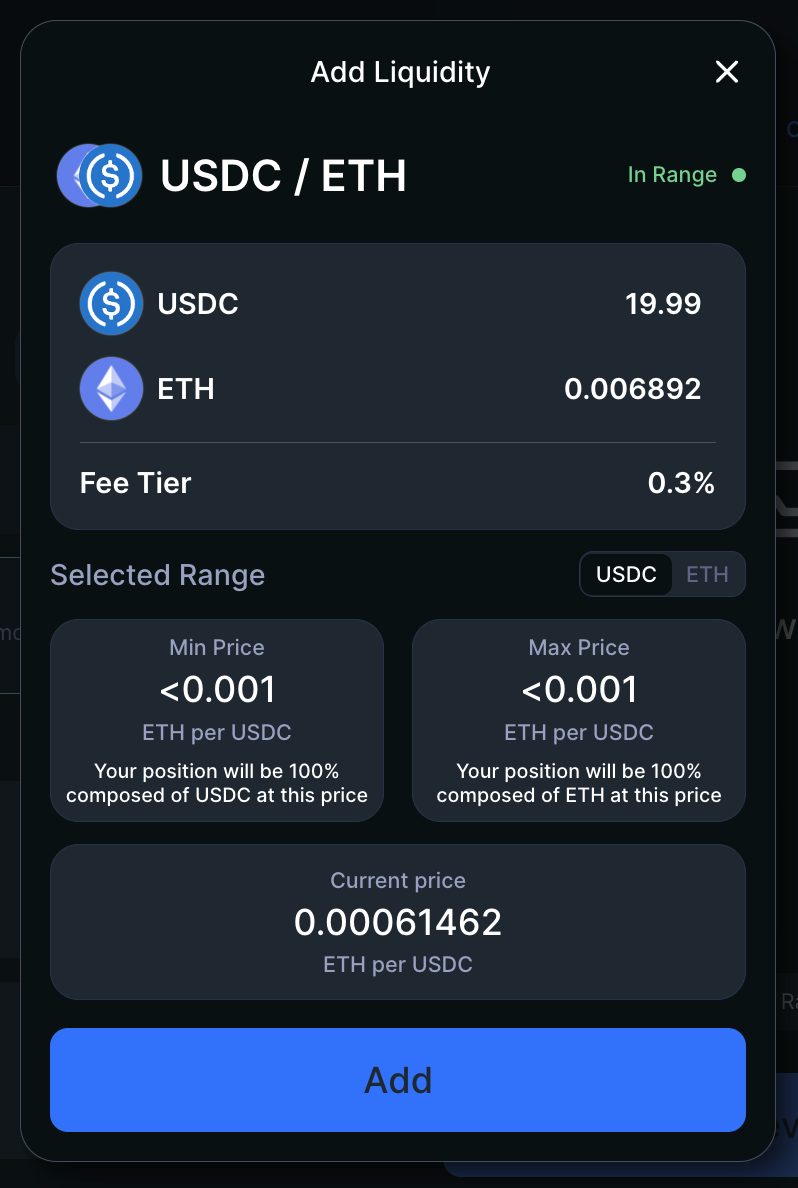
After you've entered all the necessary details for your liquidity provision, Elektrik will give you a summary or "preview" of your potential position. This includes the tokens you're depositing, the price range, the fees, and other important details.
It's crucial to review this information carefully. Ensure everything matches your intentions, from the amounts of tokens to the specific price range you've set. This is your last chance to double-check and make any changes.
Approving the Tokens
Before you can finalize adding your liquidity, there's one more security step. Elektrik will likely ask you to approve the tokens for trading within the platform. This is a common practice where you essentially give permission for the protocol to access and utilize your tokens for liquidity purposes.
You'll need to confirm this "approval transaction" in your wallet. It's a standard procedure to ensure that only you can authorize the use of your funds.
Finalizing Your Position
With the preview reviewed and the tokens approved, you're all set. Now, you can confidently select the "Add" button. This action finalizes your position and officially adds your tokens to the liquidity pool.
Congratulations! You're now a liquidity provider on Elektrik. Your tokens are part of a larger pool that helps facilitate trades on the platform, and in return, you'll collect fees from the transactions that happen within your specified price range.
Managing your position
After you've successfully added your tokens to a liquidity pool, the journey doesn't end there. Elektrik offers a way for you to actively view and manage your investments. Here's what you need to know:
Accessing Your Position
Post the completion of your liquidity provision transaction, all your active positions are listed on the Elektrik Pool page. This dedicated section is accessible directly through the Elektrik interface, usually found in the navigation menu under a section like "Your Liquidity" or directly on the "Pool" page.
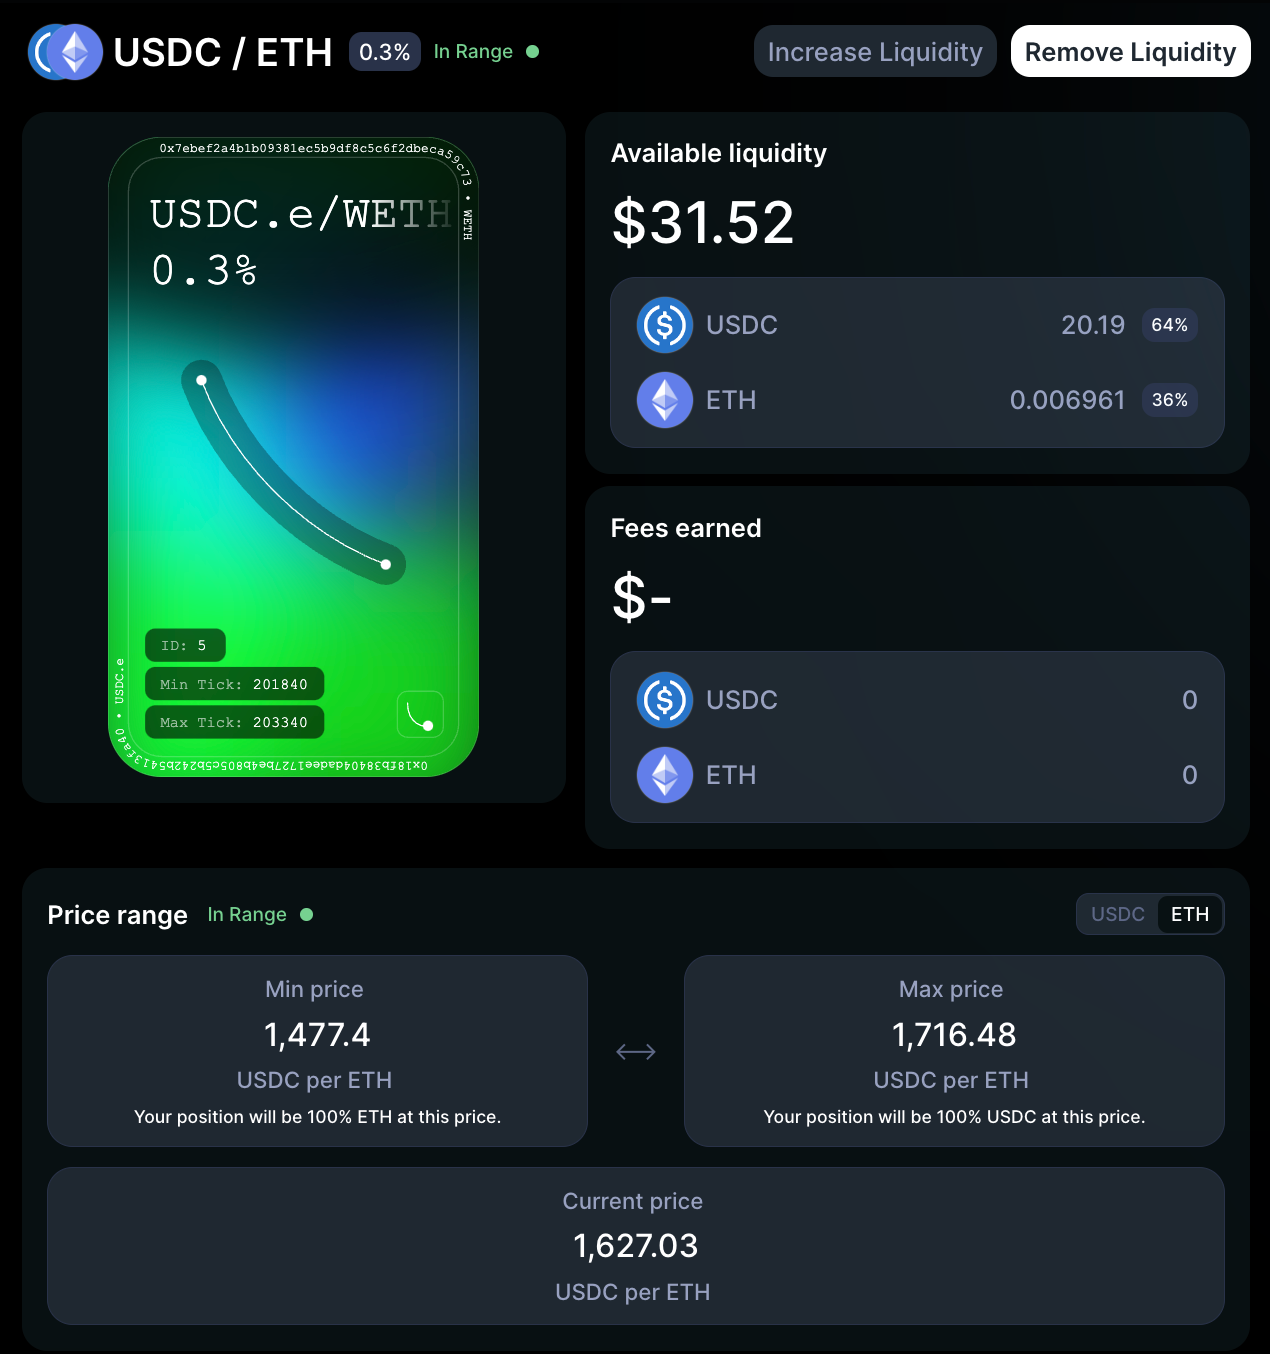
Viewing Your Investments
On this page, you'll see a detailed view of each liquidity position you've taken. This includes the amount of each token you've contributed, the current price range, your share of the pool, accumulated fees, and any changes in the position's value.
It's a comprehensive dashboard that gives you real-time insights into how your investment is performing. You can see at a glance whether you're gaining returns (through trading fees) or if there are any market movements you need to consider.
Managing Your Position
Beyond just viewing, this page is also where you can take action if needed. Depending on market conditions or your investment strategy, you might want to adjust your positions. This could include changing the price range, adding more liquidity, or even removing your investment from the pool.
The platform allows you to make these changes directly from the pool page. Just select the position you want to adjust, and you'll be prompted with options like "Add Liquidity," "Remove Liquidity," or "Adjust Range."
Conclusion: Understanding the Impact of Liquidity Provisioning
As we conclude this guide, it's evident that providing liquidity on an AMM is more than a passive investment; it's an active contribution to the efficiency and stability of a broader financial market. By adding liquidity, you facilitate smoother exchanges and earn transaction fees, a direct reward for your involvement.
Participating in a liquidity pool is not just about potential financial gains; it's a supportive act for the decentralised finance ecosystem, ensuring traders can execute orders effectively. This process, while beneficial, also requires diligence and an understanding of market dynamics.
Thank you for engaging with this guide. Your participation in DeFi, even as a learner, is a step toward enhancing a system designed for inclusivity and transparency. As you embark on this journey, may it be insightful and balanced, contributing both to your personal financial goals and the robustness of the market at large.